PixelToy 2 Reference
Return to PixelToy Manual
Apple Menu | File Menu | Options | Actions | Filters | Colors | Sets | Windows
Apple Menu
About PixelToy... | Register...
About PixelToy...
As you might guess. Also shows the exact version number in the lower left
corner. While this window is open, the main window will not animate. A
mouse click just about anywhere in PixelToy will make the About PixelToy
window go away.
Register...
Information on how to pay for this program is here, as well as a place to
type in your name and registration code when you receive them.
File Menu
Open Picture... | Reload
last Picture | Save PICT... | Save
Current Sets As... | Create Movie... | Clear Screen | Pause | Close
Window | Quit
Open Picture...
Open a picture to be distorted and drawn upon. All common image formats are
supported (PICT, JPEG, GIF, etc.). Images are used as a grayscale image
when opened, and color information is ignored because PixelToy generates
its own color. Normally, PixelToy will resize the window to match the
image's resolution, however you can disable this in the Preferences dialog. Note: This command loads your
picture once, with the Filters acting upon the resulting image over time to
remove it. If you want your picture to remain in the display, use the Images action.
Reload last Picture
Wow, PixelToy sure destroyed that picture quickly! Reload it again
automatically with this command. PixelToy will not resize the window to
fit the image; if you want it to, reopen the image with Open
Picture.
Save PICT...
Save the window's current contents as a PICT image. The image will be
stored as an 8-bit (256 color) image unless you had the High
Quality option enabled, in which case the image will be stored in
24-bit (millions of colors).
Save Current Sets As...
Save all sets shown in the Sets menu into a new Sets file. After doing
this, any further changes to the Sets will be saved to this file. See About sets.
 Create Movie...
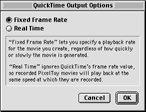
Start saving a QuickTime Movie. First, you'll be asked if you want a
Fixed Frame Rate or Real Time. A fixed frame rate lets you
specify exactly how fast you would like the movie to play back after you
have created it, regardless of how quickly or slowly the movie is created.
You specify this Frames Per Second number in the QuickTime window
you get after selecting a file name for your movie. If you choose Real
Time, the Frames Per Second value in the QuickTime window is
ignored, and instead the resulting movie will play back at precisely the
same speed at which it was recorded, allowing you to later synchronize it
with audio, for example. In the QuickTime window you'll also be asked what
compression method to use -- if your movie is intended to play back
smoothly, you'll want either the Video or Cinepak compressor.
If you're generating footage that will be used in a video editor such as
iMovie or Adobe After Effects, you'll want Photo - JPEG with quality
nearly maximum. If you're recording in Real Time, the Video
compressor (maximum quality, no keyframes) is a good choice as it
compresses very quickly. After starting to create a movie, you can hold
down command-period or select this same menu command (which will be called
"Stop Movie") to end movie creation. Tips: Use the Preferences window to set the size of PixelToy's window
numerically. You can do anything in PixelToy while generating a
movie except resize the PixelToy window.
Clear Screen
Wipes the PixelToy window clean.
Pause
Halts animation. Select this command again to start the animation again.
This command is particularly handy when creating a movie; set all of your
options, pause, clear screen, then begin creating the movie. Nothing will
be written to the movie until you un-pause the animation.
Close Window
As you might expect, except that if you close the main PixelToy window, the
program will completely quit.
Quit
The unspeakable horror!
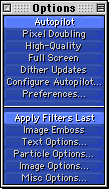 Options Menu & Window
Autopilot | Pixel
Doubling | High-Quality | Full
Screen | Dither Updates | Configure
Autopilot | Preferences | Apply Filters
Last | Image Emboss | Text Options
| Particle Options | Image Options |
Misc Options
The Options control window is identical to the pull-down menu; "checked"
items are shown brighter than normal items.
The first section of the Options menu consists of global settings which
persist even when loading sets.
Autopilot
With the Autopilot enabled, PixelToy will periodically change actions,
action options, filters, and/or color palettes. See Configure
Autopilot for details.
Pixel Doubling
Speeds up animation by lowering the image quality. A must on slower Power
Macs. Can't be on at the same time as High-Quality mode.
High-Quality
Slows down animation by increasing the image quality. Slows down animation
A LOT. Very fast Macs might perform bearably with this option, but others
will probably only want this option on when creating movies. High-Quality
mode looks best when displaying Thousands or Millions of colors. Can't be
on at the same time as Pixel Doubling.
Full Screen
Toggles between Full Screen and windowed mode. While in Full Screen mode,
you can make the menu bar appear by clicking up where it should be; it will
become visible. On multiple monitor systems, first drag the main PixelToy
window entirely onto the monitor you wish to use before invoking this
command. The first time you activate Full Screen mode, you will be asked
if you would like your display switched to low resolution whenever you
enter Full Screen mode in the future; you may later change your mind in the
Preferences window. If you quit while in Full Screen
mode, PixelToy will remember to reactivate it automatically the next time
it is launched.
Dither Updates
Only has an effect when displaying Thousands of colors, this option will
mix colors when drawing to avoid the bands of solid color that tend to
appear in Thousands of colors otherwise. This option will slow down
animation massively.
 Configure Autopilot
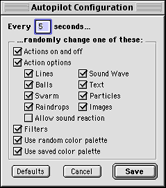
This window allows you to fine-tune PixelToy's AutoPilot
command. You may adjust the amount of time between changes, as well as
what parameters the AutoPilot is allowed to modify.
 Preferences
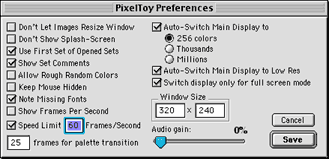
This dialog lets you control many global settings of PixelToy.
Don't Let Images Resize Window keeps the Open
Picture command from resizing the PixelToy window to the size of the
image being opened. Don't Show Splash-Screen keeps the About
PixelToy window from appearing when you start PixelToy. Use First Set of
Opened Sets enables PixelToy to automatically use the first set in a
Sets file when the file is double-clicked or drag-and-dropped on PixelToy.
Show Set Comments allows a set to display its comments when it is
used. Allow Rough Random Colors permits the Random
Palette command to create more rough-edged palettes. Keep Mouse
Hidden hides the mouse cursor when it is over the PixelToy window.
Note Missing Fonts allows PixelToy to notify you when you load a set
that uses fonts not installed on your computer. Show Frames Per
Second activates a small number in the upper left hand corner of the
PixelToy window, displaying how many frames of animation PixelToy has been
able to generate in the last second. Speed Limit will restrain the
animation speed to the number of frames-per-second that you type here.
Frames for palette transition defines how many frames of animation
are used to change color palettes. Has no effect when displaying 256
colors or less. This feature will only operate under Mac OS 8.5 or newer.
Auto-Switch Main Display to: will change your display(s) color mode
to the selected value when PixelToy is started. Auto-Switch Main Display
to Low Res will change your display to 640 x 480 pixels when PixelToy
is started. For both of these auto-switch options, the original display
settings are restored when PixelToy is exited. Switch display only for
full screen mode will limit the above auto-switch options to activate
only during Full Screen mode. Window Size allows you to set exact
dimensions for the PixelToy window, useful when creating movies. Audio
Gain is used to amplify the effect of audio on actions which respond to
sound.
Note: Currently, the speed limit is in reality limited to frames
per second rates that divide evenly into 60 (i.e. 1, 2, 3, 4, 5, 6, 10, 12,
15, 20, 30, 60). If this bothers you, e-mail
me and I may find a solution.
The second section of the Options menu consists of local settings that
are stored in sets.
Apply Filters Last
Apply Filters Last makes PixelToy apply the Filters after the Actions, instead of the normal behavior of
applying the Filters before the Actions. This is particularly useful when
using the Kaleidoscope filter.
Image Emboss
This option applies a graphic filter that makes the normal display appear
as protrusions and indentations in a surface. Embossing usually looks best
with a continuously shaded color palette such as Greyscale; if you generate
a random color palette while Image Emboss is enabled, the created palette
will be continuously shaded.
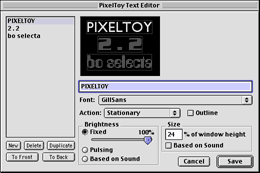 Text Options
You can edit all aspects of text in PixelToy within this window. Create up
to 16 different text objects, each with its own font, action, brightness,
and size.
List order: Text is drawn from the top of the list down; therefore,
if you have overlapping text objects, the lower item in the list will appear on
top of a higher item. You can use the To Back and To
Front buttons to shuffle your text objects around to your liking.
Actions: Stationary merely stays where you put it.
Jitter causes the text to vibrate like it's fulla caffeine.
Bouncing (Zero G) makes the text bounce off the four walls like a
ball in Pong. Bouncing (Gravity) will make the text bounce like a
ball trapped in a box, until it slows down, at which point it is given a
kick to get moving again. Wandering text objects bumble around at
random. Mouse simply makes the text appear where the
mouse cursor is. This one is best accompanied by activating the 'Keep
Mouse Hidden' option in the Preferences window.
Finally, Vibrate is a bit calmer version of Jitter.
Outline: Select this item to draw an outline around this text object to
improve its readability. This option can considerably slow down the
animation speed.
Brightness: Fixed allows you to specify a brightness level
with the slider control. Pulsing makes the text brightness go from
0% to 100% and back to 0% continuously. Based on Sound makes the
brightness of the text depend on the sound volume of the currently selected
sound input device.
Size: Text size is expressed as a percentage of the window height;
values anywhere from 0% to 400% are allowed. Based on Sound makes
the text size change based on the sound volume of the currently selected
sound input device.
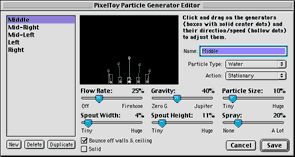 Particle Options
All particle controls are located on this window. You can have up to 16
different particle generators defined, listed on the left.
Name: This is for your organization only; the name isn't displayed
anywhere else in PixelToy.
Particle Type: Water is the default type. Bugs bumble
around, and if solid, will periodically land on bright objects. Snow
falls from the top of the screen and (once again, if solid) will collect on
bright surfaces. Repulsion particles avoid bright objects and each
other.
Action: Stationary generators stay still. Follow Mouse
aims the generator in the general direction of the mouse cursor. You may
want to activate the 'Keep Mouse Hidden' option in the
Preferences window along with this. Random makes the generator
randomly point in different directions. React To Sound makes the Flow Rate
and speed of the generator based on the sound volume of the currently
selected sound input device.
Other Controls: Flow Rate adjusts the amount of particles
which come out of the generator. Gravity controls the force pulling
the particles to the bottom of the window. Particle Size controls
the size of the individual particles; to ensure that the particles look the
same with and without Pixel Doubling enabled, set the
size to at least 10%. Spout Width and Spout Height control
the size of the area from which the particles are emitted. Spray
controls how much particles can randomly vary from the direction and speed
you have defined in the preview window. Bounce off walls & ceiling
allows you to only let the particles out through the bottom of the window.
Solid particles are affected by other objects (including each
other). Be careful; if your flow is high and your spout is small, solid
particles will bunch up and 'clog up' the particle generator. Repulsion
particles are always solid.
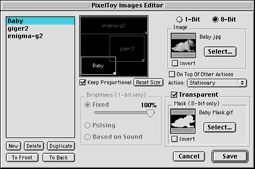 Image Options
Everything controlling the display of image objects is accessed in this
window. You can have up to 16 image objects defined. Clicking in the
preview window lets you select, move, and resize your image objects.
 1-Bit/8-Bit: 1-Bit images are 'flat' and only display two
colors. When 1-Bit images are transparent, only the light color is drawn,
leaving other areas untouched. You can control the 'brightness' of 1-Bit images
by defining it as Fixed where you select a value with a slider
control, Pulsing constantly changes from 0% to 100% back to 0%
brightness, and Based on Sound will set the brightness based on
the volume of the current sound input. 8-Bit images can use the
entire PixelToy color palette of 256 colors, but their brightness is
unchangeable. To make an 8-Bit image transparent, you must select another
image file to use as a 1-Bit mask file.
Action: See the description for Text
objects -- all behaviors for images are the same.
Other controls: Invert reverses black and white in the
image (or mask) file. Keep Proportional forces image resizing to
remain at the original image's aspect ratio. This check box also affects
the Autopilot's ability to randomly resize image objects.
Reset Size will set the current image object's size to the actual
pixel size of the selected image file. If you hold down the option key
when clicking Reset Size, all image objects will have their sizes
reset.
On Top Of Other Actions forces this image object to be drawn after all
other PixelToy actions, assuring it will not be obscured by anything (other
than possibly other image objects also using this feature).
Image files selected are NOT stored in PixelToy or PixelToy's Sets
files in any way -- if you move or rename any image files you refer to with
a PixelToy image object, PixelToy will not be able to find and draw it.
The best solution is to keep the image files you use in the same
folder as the Sets file you are using (i.e. the same folder as the
PixelToy application, normally). If you transfer a Sets file to another
computer, be certain to include any images you are using as image objects!
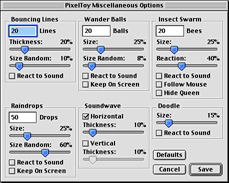 Misc Options
Actions other than the Particle Generator, Text, and Images are customized here.
Control the number, size, and other features for each action
individually.
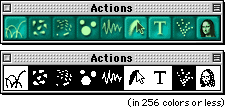 Actions Menu & Window
Bouncing Lines | Wander
Balls | Insect Swarm | Raindrops |
Sound Wave | Doodle | Text | Particles | Images
Holding down the option key when clicking on a button in the Actions window
will take you a dialog to let you edit that action's parameters.
Bouncing Lines
Lines that arc and bounce across the screen. You can use the Misc Options dialog to control how many lines exist, line
thickness, and whether or not they change size based on sound input.
Wander Balls
Circles that wander aimlessly around the screen. You can use the Misc Options dialog to control how many dots exist, ball
size, and whether or not they change size based on sound input.
Insect Swarm
A swarm of bees tries to catch the queen bee, while the queen bee chases
after a point that changes every time it catches it. You can use the Misc Options dialog to make the queen bee chase the mouse
cursor, hide the queen been, define how many bees exist, control how
quickly the 'drones' react to the queen, and specify whether or not they
change size based on sound input.
Raindrops
Random circles splat all over the screen like fat raindrops. Use the Misc Options dialog to control rain rate, size and sound
reaction.
Sound Wave
Draws a sound waveform based on the device defined as your sound input. In
the Misc Options dialog you can set a horizontal
waveform and/or a vertical waveform, along with their thicknesses. You can
select your input device in the Monitors & Sound (just "Sound" in Mac OS
9) control panel or more
quickly from the Control Strip. Using the microphone is fun, but using
the CD as sound input while playing your favorite CD is just too cool.
Doodle
With this option turned on, you can click and drag in the PixelToy window
to draw. You can control line thickness in the Misc
Options dialog.
Text
Enables any text objects to be drawn; see the Text
Options command for information on creating text objects.
Particles
Enables any particle generators to be drawn; see the Particle Options command for information on creating
particle generators.
Images
Enables any image objects to be drawn; see the Image Options command for information on creating
image objects.
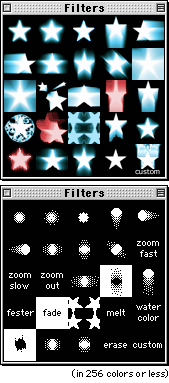 Filters Menu & Window
About Filters
Menu bar: Selecting these menu items toggles the filter you
selected; you can have any number of filters turned on, though the more
filters you have on, the slower the animation will be. You can activate a
filter by itself by pressing the letter key preceding its name; all other
filters are turned off automatically. If you want to add a filter
via the keyboard, hold down the shift key when typing the letter.
Filter window: Active filters are shown in red. Clicking on a
filter icon activates that filter by itself. To add a filter, shift
click on its icon. Holding down the option key when clicking on the
'custom' filter icon brings up the Edit Custom Filter dialog
window.
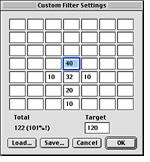 Edit Custom Filter
All of the preset filters are fast because they are optimized specifically
for what they do. If none of the presets do what you want, you may be able
to achieve the desired effect via the Custom Filter. Every pixel
that is filtered through the custom filter uses this table of numbers to
determine the filter behavior. The center cell represents the pixel you
are generating, all others represent neighboring pixels. A number
represents the weight, or importance of a pixel. In this example, the
original pixel is worth 40, the pixel directly below is worth 32, and so
on. All of the pixel values are added up based on these weights, and
divided based on the target value. Normally you want your total and
target equal (100%), but interesting effects can be generated by setting a
lower or higher target. Numbers used here are arbitrary and are only
important in their values relative to one another. The percentage shown
next to the total is the only absolute number used in this dialog. You can
load and save custom filter settings -- the quickest way to learn how the
custom filter works is to load some of the included filters and observe the
resulting effect. Note that because of its user-defined nature, the
Custom Filter is not optimized and can be several times slower than the
preset filters.
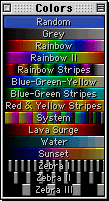 Colors Menu & Window
Random | Add this
Palette... | Delete a Palette... | Previous | Next
About Color Palettes
Clicking on a color palette in the Colors window uses that palette.
Adjusting the 'Frames for palette transition' number in the Preferences dialog allows you to control the speed at which
the new palette takes effect. However, if PixelToy's graphic window is on
a monitor displaying 256 colors or less, palette transitions are always
immediate. PixelToy is unable to perform smooth palette transitions unless you
are using Mac OS 8.5 or newer.
Random
Generates a new palette randomly. They can't all be gems - luckily the
random palette generator is instantaneous. If you have the Image Emboss option turned on, the palettes generated will
be of only one hue, in a smooth gradient. Activating the 'Allow Rough
Random Colors' option in the Preferences dialog will make
the generated palettes more rough-edged.
Add this Palette...
Allows you to add the current color palette to PixelToy's Colors window.
After adding a color palette, you can always return to it by selecting it
again. Technical Note: Color Palettes are stored within the PixelToy
application itself as 'clut' resources.
Delete a Palette...
Here you can remove that truly awful color palette you created earlier. You
can delete any palette stored in PixelToy, including the ones PixelToy came
with. However, you can't delete the 'Grey' palette.
Previous
Activate the previous color palette listed in the Colors menu.
Next
Activate the next color palette listed in the Colors menu.
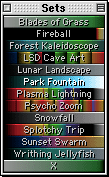 Sets Menu & Window
Add this set | Delete a
set | Rename a set | Edit set
comments | Zero Settings | Timed Set
Cycle | Previous | Next
About Sets
Clicking on a set in the Sets window will load it. Holding down the option
key when clicking on a set allows you to rename it.
Add this set...
This command allows you to take a 'snapshot' of all of the current settings
and save them under a single name. You can then later select this name
from the Sets menu to restore these settings all at once.
Delete a set...
Allows you to delete a set from the Sets menu. If you want to remove them
all, just delete the current Sets file while PixelToy isn't running.
Rename a set...
Since Sets are always listed in alphabetic order, this is a handy way to
arrange your sets in the order you want them.
Edit set comments...
Edit the comment for an existing set. If the Show Set Comments option in
Preferences is on, the comment is displayed when the set
is loaded.
Zero Settings
This command turns off all filters and all actions, selects a grey color
palette and resets default set options.
Timed Set Cycle...
After selecting this option, you can specify how many seconds you wish to
elapse between set changes. This effectively selects the Next set command for you every X seconds. Select this
command again to stop set cycling.
Previous
Activate the previous set defined in the Sets menu.
Next
Activate the next set defined in the Sets menu.
Windows
Show/Hide All |
Move & Size As Group |
Default Positions |
Show/Hide other
Show/Hide All
Use this command to show or hide all of the control windows at once. If
any control windows are showing, this command will hide them. Otherwise,
it will show all control windows.
Move & Size As Group
With this option active, moving any control window or the main
PixelToy window will move all windows. Additionally, resizing the
main PixelToy window will appropriately move any control windows to the
right or below the PixelToy window.
Default Positions
This command moves your PixelToy
window (at its current resolution) to the center of your display and
arrays the control windows all around it.
Show/Hide other
All other commands in this menu are used to individually show or hide
specific control windows.
Return to PixelToy Manual